Versatile Pleat Heading Can Transform to 5 Major Heading Styles
Versatile pleat curtain tape, combined with curtain hooks, can form at least 5 major headings:
- Hill Triple Pinch Pleat
- Small Triple Pinch Pleat
- Big Triple Pinch Pleat
- Valley Triple Pinch Pleat
- Cartridge Pleat
Let's take a look at our versatile curtain tape and hook first.

Versatile pleat curtain tape has a row of pocket (marked from "1" to "9") at regular intervals on the back, and curtain hook has 4 needles (marked from "a" to "d"). When these needles are inserted into the pockets of curtain tape following instructions below, the corresponding heading style will be formed.
1. Hill Triple Pinch Pleat
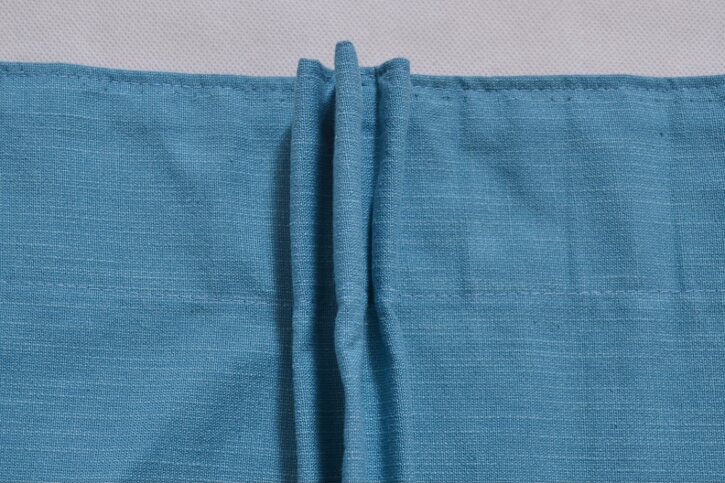
Hill triple pinch pleat has a big pleat in the middle, and a smaller pleat at each side. You can form this heading with 6 easy steps:
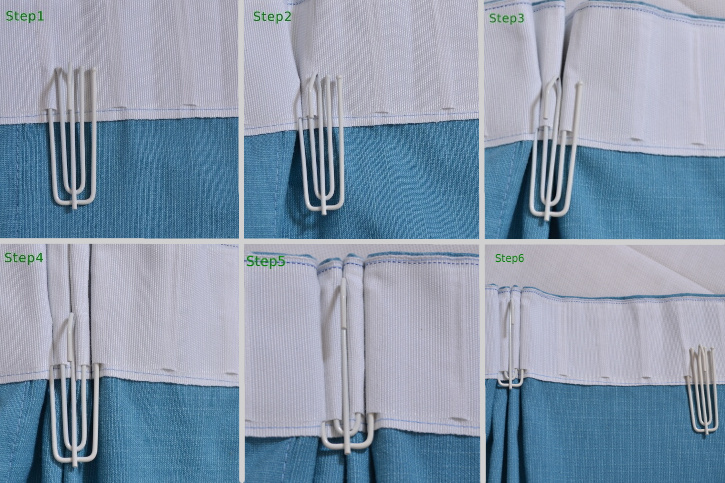
Step 1: Insert needle "a" into pocket "1". When you insert the first needle, insert about ⅓ depth into the pocket so that you can insert the next a few needles easily.
Step 2: Insert needle "b" into pocket "2".
Step 3: Insert needle "c" into pocket "4".
Step 4: Insert needle "d" into pocket "5".
Step 5: Push the hook into the rest ⅔ part of the pocket. Adjust the tape and hook so that the pleat is nice-looking. Then the first pleat is formed.
Step 6: Skip 3 pockets, and repeat step 1 to step 5 until all the pleats are formed.
Note: You can surely skip other number of pockets to separate each hill triple pinch pleat, 3 is just the normal practice. The less pockets you skip, the more frequent the hill triple pinch pleats will be.
We recommend 2 times fullness for hill triple pinch pleat, and 5 hooks per meter will be provided for free by default.
2. Small Triple Pinch Pleat
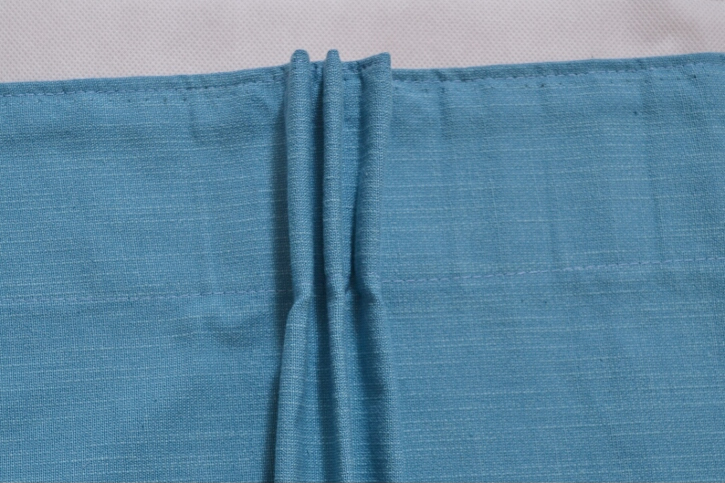
Small triple pinch pleat has three small pleats of the same size. Small tripe pinch pleat looks simple and smart. You can form this heading with 6 easy steps:
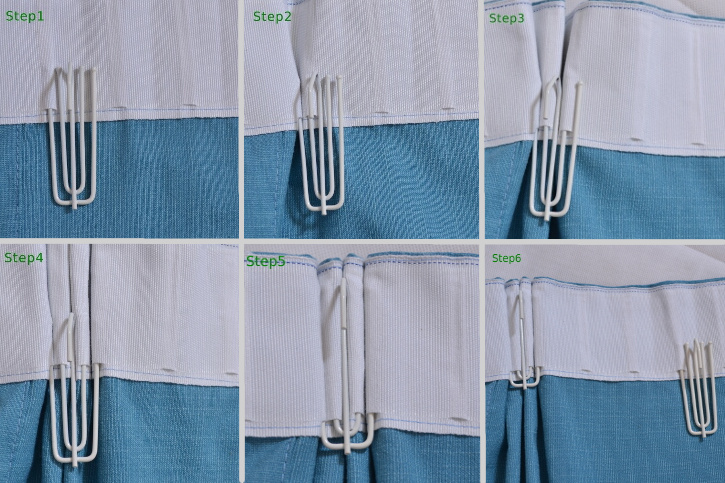
Step 1: Insert needle "a" into pocket "1" of the tape. When you insert the first needle, insert about ⅓ depth into the pocket so that you can insert the next a few needles easily.
Step 2: Insert needle "b" into pocket "2".
Step 3: Insert needle "c" into pocket "3".
Step 4: Insert needle "d" into pocket "4".
Step 5: Then push the hook into the rest ⅔ part of the pocket. Adjust the tape and hook so that the pleat is nice-looking. Then the first pleat is formed.
Step 6: Skip 2 pockets, and repeat step 1 to step 5 until all the pleats are formed.
Note: You can surely skip other number of pockets to separate each small triple pinch pleat, 2 is just the normal practice. The less pockets you skip, the more frequent the small triple pinch pleats will be.
We recommend 2 times fullness for small triple pinch pleat, and 5 hooks per meter will be provided for free by default.
3. Big Triple Pinch Pleat
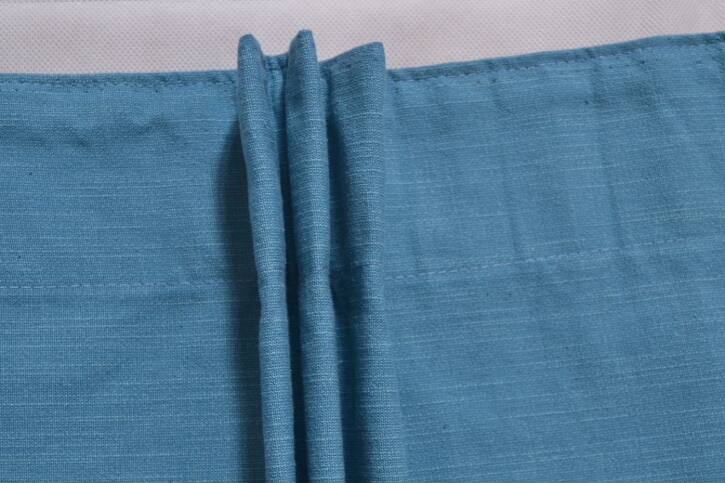
Big triple pinch pleat has three big pleats of the same size. Big tripe pinch pleat is more suitable for big windows. You can form this heading with 6 easy steps:

Step 1: Insert needle "a" into pocket "1" of the tape. When you insert the first needle, insert about ⅓ depth into the pocket so that you can insert the next a few needles easily.
Step 2: Insert needle "b" into pocket "3".
Step 3: Insert needle "c" into pocket "5".
Step 4: Insert needle "d" into pocket "7".
Step 5: Then push the hook into the rest ⅔ part of the pocket. Adjust the tape and hook so that the pleat is nice-looking. Then the first pleat is formed.
Step 6: Skip 3 pockets, and repeat step 1 to step 5 until all the pleats are formed.
Note: You can surely skip other number of pockets to separate each big triple pinch pleat, 3 is just the normal practice. The less pockets you skip, the more frequent the big triple pinch pleats will be.
We recommend 2.5 times fullness for big triple pinch pleat, and 5 hooks per meter will be provided for free by default.
4. Valley Triple Pinch Pleat
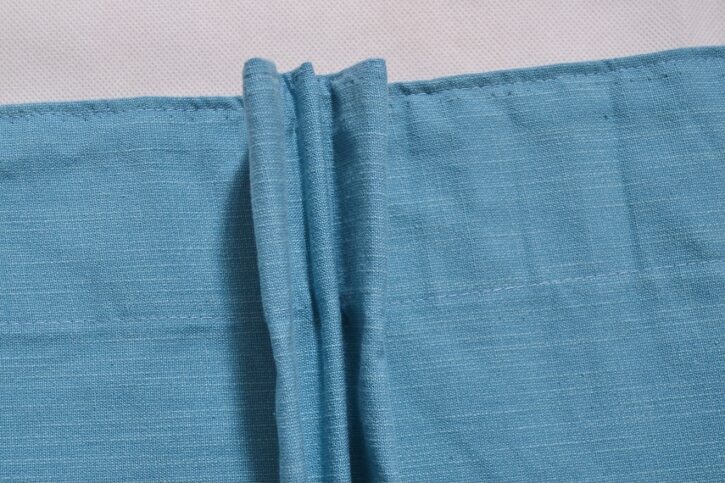
Valley triple pinch pleat has a small pleat in the middle and a big pleats at each side. Valley triple pinch pleat is unique and can create innovative effect. You can form this heading with 6 easy steps:

Step 1: Insert needle "a" into pocket "1" of the tape. When you insert the first needle, insert about ⅓ depth into the pocket so that you can insert the next a few needles easily.
Step 2: Insert needle "b" into pocket "3".
Step 3: Insert needle "c" into pocket "4".
Step 4: Insert needle "d" into pocket "6".
Step 5: Then push the hook into the rest ⅔ part of the pocket. Adjust the tape and hook so that the pleat is nice-looking. Then the first pleat is formed.
Step 6: Skip 2 pockets, and repeat step 1 to step 5 until all the pleats are formed.
Note: You can surely skip other number of pockets to separate each valley triple pinch pleat, 2 is just the normal practice. The less pockets you skip, the more frequent the valley triple pinch pleats will be.
We recommend 2.5 times fullness for valley triple pinch pleat, and 5 hooks per meter will be provided for free by default.
5. Cartridge Pleat
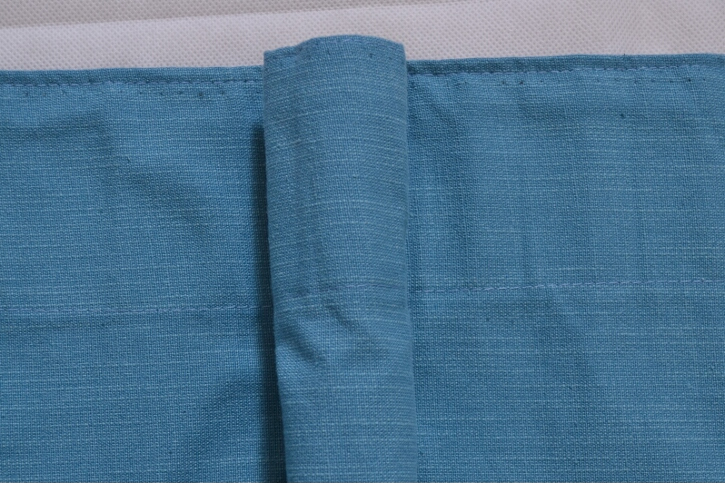
Cartridge pleat is basically a goblet pleat which has not been folded and stitched in at the base. Cartridge pleat is good at adding artistic atmosphere to the house. You can form this heading with 4 easy steps:
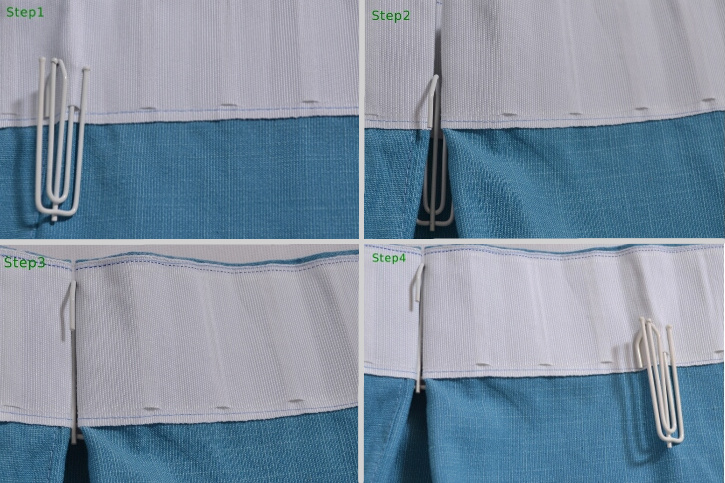
Step 1: Hold the hook with inside out, and insert needle "b" into pocket "1" of the tape. Please make sure that you have finished this step correctly.
Step 2: Turn the hook 180 degree, and insert needle "c" into pocket "4".
Step 3: Then push the hook into the pocket completely. Adjust the tape and hook a little, then the first cartridge pleat is formed.
Step 4: Skip 3 pockets, and repeat step 1 to step 3 until all the pleats are formed.
Note: You can surely skip other number of pockets to separate each cartridge pleat, 3 is just the normal practice. The less pockets you skip, the more frequent the cartridge pleats will be.
We recommend 2.5 times fullness for valley cartridge pleat, and 5 hooks per meter will be provided for free by default.


